

RetroArch is designed to be controlled primarily with a controller. In its documentation, RetroArch uses the broad term "controller" to cover any input hardware that might otherwise be called a joypad, gamepad, joystick, or similar device. This guide summarizes the official input and controls documentation, covering the RetroPad abstraction, autoconfiguration, manual binding, multiplayer layout, hotkeys, per-core remapping, and default keyboard bindings.
What is a RetroPad?
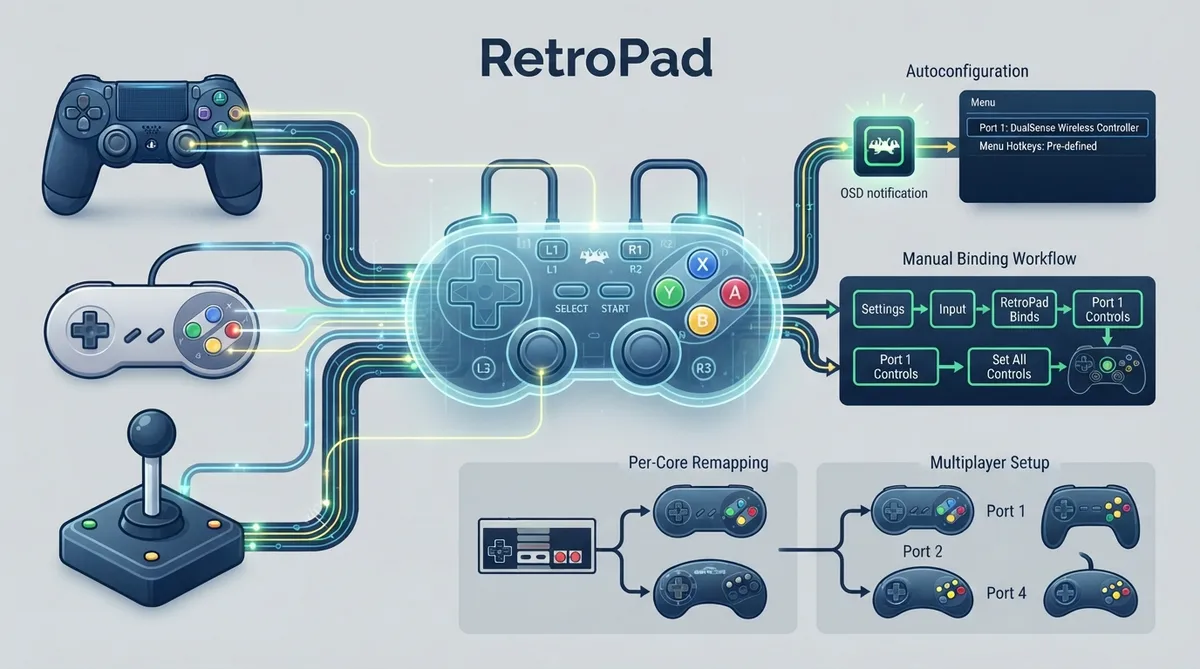
RetroArch maps real-world controller inputs to a virtual controller called a RetroPad. The RetroPad resembles a common modern controller layout and includes a D-pad, four face buttons in an ABXY layout like a SNES gamepad (A-right, B-bottom, X-top, Y-left), Select and Start buttons, two shoulder buttons (L1 and R1), two trigger buttons (L2 and R2), and dual analog sticks like a Sony DualShock, which can also be pressed as buttons (L3 and R3).
You do not have to map every RetroPad button to a real-world button. If your real controller has fewer buttons than a DualShock, some virtual RetroPad buttons may remain unmapped, which the documentation notes is perfectly acceptable. If your real controller has more buttons, the extra buttons may be used as freely configurable hotkeys.
Controller autoconfiguration
Most well-known controllers should work out of the box through the RetroArch autoconfiguration profile database. If a controller can be autoconfigured, the on-screen display (OSD) informs you of the autoconfiguration event. The menu hotkey is often pre-defined in the autoconfiguration profile. Not all controllers have autoconfigs; if yours does not, manual RetroPad binding is available.
Manual RetroPad binding
If your gamepad is not recognized by autoconfiguration, or if you want to change its RetroPad binding, use the Input settings menu. The documented steps are:
- Navigate to Settings
- Navigate to Input
- Navigate to RetroPad Binds
- Navigate to Port 1 Controls
- Select Set All Controls
- Press the buttons as required
Controls for multiplayer
To set up local multiplayer for games that support it, navigate to Settings, then Input, then RetroPad Binds. There you will find options to set binds for multiple users. To assign User 1's controller:
- Navigate to Port 1 Controls
- Select Device Index
- Select which currently plugged-in controller will be assigned to this player
- Go back, select Port 2 Controls, and repeat for user 2
When multiple controllers are present, RetroArch assigns them by default in the order the operating system presents them. The documentation notes that device reservation options are available for more explicit assignment of controllers to players.
Hotkeys
Hotkeys are button combinations used for actions such as saving, loading, and exiting games. Hotkey binds are configured at Settings → Input → Hotkeys. If you map Enable Hotkeys to a button, that button must be held to trigger any hotkeys.
Remapping controls for individual cores or content
Core Controls Remapping changes how the core receives input rather than how the gamepad is bound in RetroArch. For example, you can tell an individual core to swap buttons A and B on the RetroPad for gameplay, while "A" still selects in the RetroArch menu and "B" still goes back. This differs from changing the gamepad bindings in RetroArch itself, which would also swap the menu behavior.
- Start content with the core you want to remap controls for
- Go to Quick Menu and then Controls
- Configure the buttons as you want
- Select Save Core Remap File, or select Save Game Remap File for the current game only
Default RetroArch keyboard bindings
In addition to controller input, RetroArch provides a remappable set of keyboard bindings to the RetroPad abstraction and to its hotkeys. These keyboard mappings are valid both in-game and in the menu. The arrow keys, Q, W, Z, X, A, S, Shift, and Enter keys are all mapped within this general controller mapping scheme.
Documented hotkey actions include Esc (Exit RetroArch), Spacebar (Fast forward toggle), L (Fast forward hold), P (Pause), E (Slow motion), R (Rewind), H (Reset), and F1 (Menu toggle), among others.
Cores with direct keyboard input
Some cores, such as arcade emulator cores and vintage computer emulator cores, can be configured to read the keyboard directly or read controls that use a keyboard interface. The documentation notes that if a core is configured for direct keyboard access, using Game Focus mode (default: Scroll Lock) is recommended to disable RetroArch bindings while using the keyboard device. Alternatively, you can unbind the conflicting RetroArch keyboard-to-RetroPad and hotkey bindings if only a few keys are needed. Otherwise, keyboard input may be captured by RetroArch hotkeys and the core may not receive it.
Platform-specific controls: Nintendo Switch
For Nintendo Switch, the official documentation states that all USB keyboards appear to work, while not all mice appear to work. A linked mouse compatibility sheet is provided in the source. The Switch touchscreen can also be used for mouse control like a laptop touchpad, with documented gestures including single finger drag for pointer movement, single short tap for left click, dual finger short tap for right click, dual finger drag for left-button drag-and-drop, and three finger drag for right-button drag-and-drop.
Reference table · Scroll horizontally to see all columns.
| Keyboard | RetroPad Mapping | Menu Action |
|---|---|---|
| Up Arrow | RetroPad Up | Move cursor up |
| Down Arrow | RetroPad Down | Move cursor down |
| Left Arrow | RetroPad Left | Move cursor left |
| Right Arrow | RetroPad Right | Move cursor right |
| Q | RetroPad L1 | Scroll one page up |
| W | RetroPad R1 | Scroll one page down |
| Z | RetroPad B | Return to the previous screen |
| X | RetroPad A | Select Item |
| A | RetroPad Y | Scan content / Remove highlighted input bind |
| S | RetroPad X | Search |
| Shift | RetroPad Select | Help |
| Enter | RetroPad Start | See menu controls |
Reference table · Scroll horizontally to see all columns.
| Keyboard Input | In-Game Action |
|---|---|
| Esc | Exit RetroArch |
| Spacebar | Fast forward toggle |
| L | Fast forward hold |
| P | Pause |
| K | Frame advance |
| E | Slow motion |
| R | Rewind |
| H | Reset |
| F1 | Menu toggle |
| F2 | Save state |
| F3 | Show FPS |
| F4 | Load state |
| F5 | Desktop menu |
| F6 | Decrease current state slot |
| F7 | Increase current state slot |
| F8 | Take screenshot |
| F9 | Mute |
| F11 | Grab mouse |
| + | Volume Up |
| - | Volume Down |
| F | Fullscreen toggle |
| M | Next shader |
| N | Previous shader |
| I | Netplay toggle play/spectate |
| U | Cheat toggle |
| Y | Next cheat |
| T | Previous cheat |
Reference table · Scroll horizontally to see all columns.
| Touch Input | Effect |
|---|---|
| Single finger drag | Move the mouse pointer (indirectly like on a touchpad) |
| Single short tap | Left mouse click |
| Dual finger short tap | Right mouse click |
| Dual finger drag | Drag and drop (left mouse button held) |
| Three finger drag | Drag and drop (right mouse button held) |
 View full image
 Sources & references
Published .
RetroArch: input and controls — official gaming software documentation https://raw.githubusercontent.com/libretro/docs/master/docs/guides/input-and-controls.mdRetrieved Oct 8, 2026Something doesn’t match your setup?
Suggest a correction