

Prerequisites
- The documentation lists two requirements:
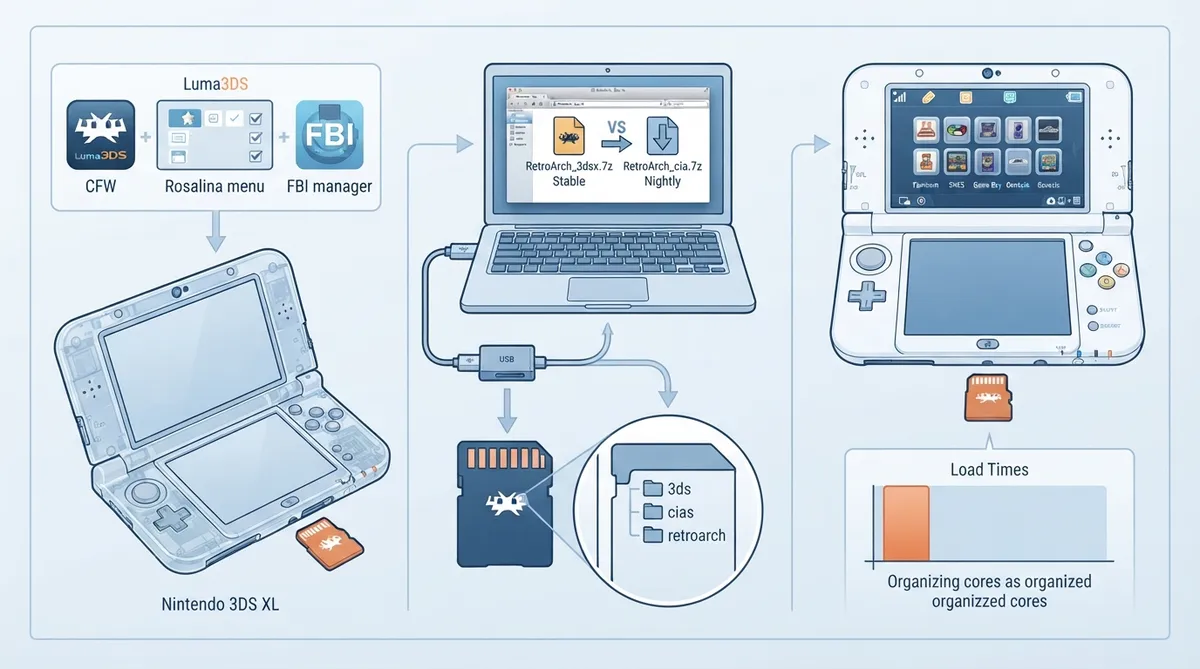
Custom firmware (CFW) is required to run RetroArch on a 3DS or 2DS.
An installer is also required. The documentation lists two options: the FBI installer or the Rosalina Menu from Luma.
Downloading the bundle
There are multiple ways to download RetroArch for a 3DS or 2DS. The documentation describes two release channels: Stable and Nightlies. Both provide a bundle containing RetroArch, all the cores and all the assets. The downloads come as either RetroArch_3dsx.7z or RetroArch_cia.7z.
For the Stable bundle, the documented location is the stable buildbot listing for Nintendo 3DS. Download either RetroArch_3dsx.7z or RetroArch_cia.7z from there.
For Nightlies, the documented location is the nightly buildbot listing for Nintendo 3DS. Pick the latest version based on date, then download RetroArch_3dsx.7z or RetroArch_cia.7z.
Installing RetroArch and its cores
Extract the RetroArch folder to the root of the SD card. Place RetroArch.cia anywhere else.
To install cores, use the FBI installer. Open the RetroArch folder and then the Cores folder, select the cores you want, and install them. The documentation gives the example of installing pcsx_rearmed_libretro.cia for PlayStation 1 ROMs.
Reducing core and content loading times
By default, all cores are installed in the directory /RetroArch/Cores. With this configuration, RetroArch cores on 3DS take nearly 30 seconds to start because every core in /RetroArch/Cores must be initialized, including cores that may not be needed. Content takes roughly 30 seconds to finish loading as well. Slow microSD random access and transfer speeds on the 3DS are described as a likely cause.
According to the documentation, separating used and unused cores can reduce loading time for cores and content to about 5 seconds each.
- The documented steps are:
Determine which cores you will use. These cores remain in the /RetroArch/Cores directory.
Create a directory for unused cores; the documentation suggests a name such as /RetroArch/Cores-Notused.
Move unused cores from /RetroArch/Cores to /RetroArch/Cores-Notused.
When additional cores are needed, move them back from /RetroArch/Cores-Notused to /RetroArch/Cores. The documentation states this ensures only the required cores are initialized by RetroArch, minimizing start times for cores and content.
Notes for MAME cores
MAME content numbers in the thousands of items for MAME cores. To help reduce loading time, the documentation suggests creating two directories for MAME content so that frequently loaded content starts faster.
- The two suggested directories are:
A directory for favorite MAME content, containing content that will be loaded often.
A directory for all remaining MAME content, containing content that will be loaded infrequently.
This approach works as long as the MAME content romset is a Full Non-Merged romset. If the romset is not Full Non-Merged, all MAME content must remain in the same directory.
Control configuration for MAME cores
Much of the content loaded by the RetroArch MAME cores uses a Vertical display perspective for the top 3DS screen, requiring the user to rotate the 3DS counter-clockwise to see the game content and access the game controls. With this configuration, the default controls are not suitable because the controls are typically configured for Horizontal display perspective.
One documented approach is to configure Global Options for controls, which would apply to the majority of games that use Vertical display perspective. For games with a Horizontal display perspective, the MAME menu may be used to configure a game controller configuration for that specific content.
- The documentation gives this configuration example when the majority of content uses a vertical configuration. Load RetroArch, then:
Bind a menu hotkey. From Main Menu, navigate to Settings -> Input -> Hotkeys. Scroll down to Menu Toggle Gamepad Combo or Menu (Toggle) and configure it as desired, so the menu can be displayed within content.
Configure global controls for vertical content. From Main Menu, navigate to Settings -> Input -> Port 1 Controls and configure as desired.
Configure in-game controls for a piece of horizontal content. Load the content, then press the defined hotkey to display the Quick Menu. Scroll down and select Options, then scroll down to select Display MAME menu, and change it to ON. Resume content. On the MAME menu, select Input (this game) and adjust the settings as desired. Finally, use the previous steps to set Display MAME menu back to OFF.
Following these steps is intended to allow all content to use the proper control configuration. Because this article is a source summary and no independent verification was performed, check the current official RetroArch documentation for your console and firmware version before making changes.
Reference table · Scroll horizontally to see all columns.
| Item | Documented location |
|---|---|
| RetroArch folder | Root of the SD card |
| RetroArch.cia | Anywhere else |
| Cores (default) | /RetroArch/Cores |
| Unused cores (suggested) | /RetroArch/Cores-Notused |
Reference table · Scroll horizontally to see all columns.
Sources & references
Published .
RetroArch: install 3ds2ds — official gaming software documentation https://raw.githubusercontent.com/libretro/docs/master/docs/guides/install-3ds2ds.mdRetrieved Oct 8, 2026Something doesn’t match your setup?
Suggest a correction