

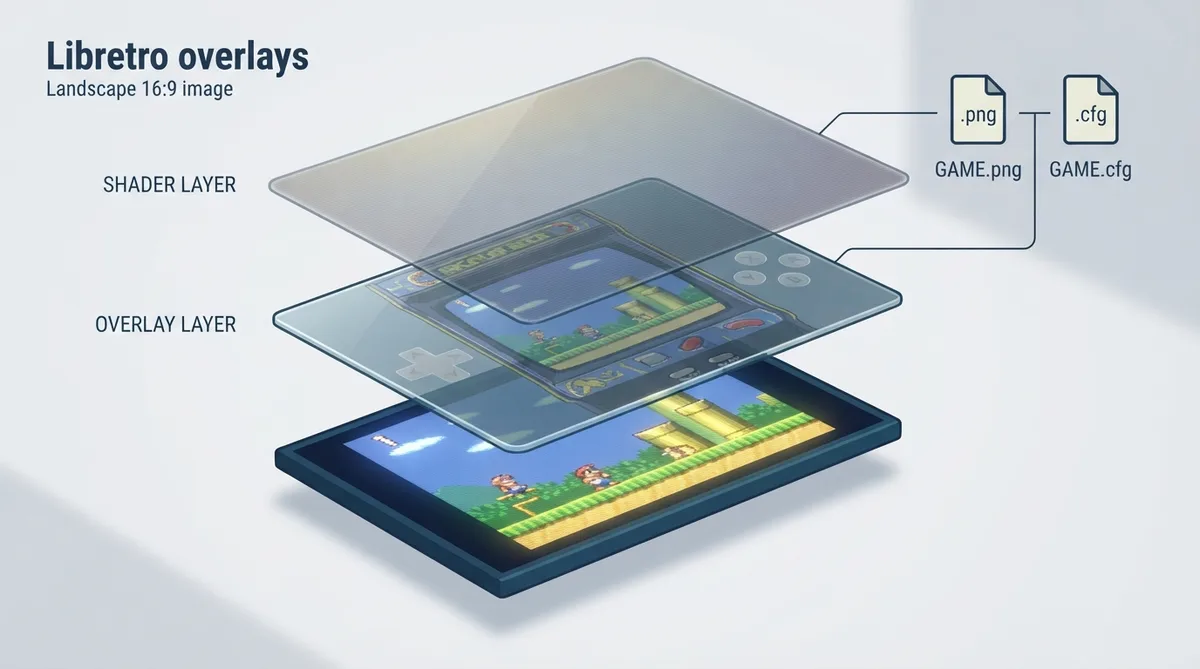
Libretro overlays place a virtual layer between you and the video signal produced by a libretro core. That layer can carry touchscreen buttons, decorative artwork, or an image of a vintage CRT television wrapped around the emulated picture. This guide summarizes the official libretro documentation on overlays: what they are, how they relate to bezels and shaders, and the documented menu and configuration steps for turning them on.
What a libretro overlay is
A libretro overlay is a virtual layer between the user and the video signal. The official documentation compares it to a clear sheet of glass placed over the screen that you can draw on, attach touchscreen buttons to, or use to display an image of a vintage CRT television.
Overlay and bezel: how they differ
In libretro terms, bezels are one subtype of overlay. A bezel is an image that wraps around the emulated screen, often to show the original arcade cabinet or game console being emulated.
Overlay and shader: how they differ
Shaders manipulate the video image produced by the libretro core, and they are often used together with overlays. For example, a shader might alter an emulated video output to resemble a vintage CRT television, while an overlay wraps an image of that television around the emulated video. Another documented combination is using a shader to enhance dithered or low-resolution images from a handheld core on a modern HD smartphone while an overlay adds touchscreen buttons.
Files required to activate an overlay
- Activating an overlay requires at least one image file (.png) and a configuration file (.cfg).
- The configuration file must have exactly the same name as the first image file — and the only image file if the overlay uses just one.
- Do not use spaces in the filename.
- Place the image and configuration files together in the libretro overlay folder.
Activating an overlay through the RetroArch GUI
- Open the RetroArch Settings menu.
- Find the Onscreen Display submenu.
- From that menu, activate the Overlay system.
- Select which overlay file to display.
Setting up per-core overlays
The official documentation describes two routes to per-core overlays: the RetroArch GUI and RetroArch CFG files. The CFG file route is marked "To be written" in the source, so that procedure is not documented.
- In the Settings menu, open the User Interface submenu and enable Show Advanced Settings.
- In the Settings menu, open the Configuration submenu and make sure Use Content-Specific Core Options If Available and Load Override Files Automatically are enabled.
- Set up the overlay according to your preferences.
- Load a game, open the RetroArch Quick Menu, and use the GUI to configure the overlay to your preferences.
- From the Quick Menu, select Save Core Overrides.
Setting up per-game overlays
Per-game overlays can also be configured through the GUI. The source also lists a CFG file approach; the GUI steps are summarized below.
- In the Settings menu, open the User Interface submenu and enable Show Advanced Settings.
- In the Settings menu, open the Configuration submenu and make sure Use Content-Specific Core Options If Available and Load Override Files Automatically are enabled.
- Load a game, open the RetroArch Quick Menu, and use the GUI to configure the overlay to your preferences.
- From the Quick Menu, select Save Game Overrides.
Per-game overlays via RetroArch CFG files
- Ensure these two options are set in retroarch.cfg: game_specific_options = "true" and auto_overrides_enable = "true".
- The first time you load content with these settings, RetroArch creates a settings override directory structure and a .opts configuration file you can use as a template for naming and locating your overlay configuration files.
- If the automatically generated file is named Dinothawr.opts, name your per-game override Dinothawr.cfg.
- The new RetroArch .cfg should include only the options you want to change for that single game.
Per-game configuration is not limited to overlay settings. The documentation notes you can also set other content-specific options in the same file, such as video_shader_enable = "true" and a shader path.
Overlay options that can be changed
The documented overlay-related options available for per-core or per-game configuration are: input_overlay (path to the correct overlay), input_overlay_enable, input_overlay_opacity, input_overlay_scale, input_overlay_enable_autopreferred, input_overlay_show_physical_inputs, and input_overlay_hide_in_menu.
Where to find overlays
- Interactive overlays are managed in the libretro common-overlays repository.
- Decorative border overlays are managed in the libretro overlay-borders repository.
Overlays are a separate layer from both the emulated video and any shader you apply. Because they are assembled from a PNG image plus a matching .cfg file, the naming rules and the shared overlay folder are the parts most likely to cause an overlay not to load.
Sources & references
Content responsibility: FrameTinker editorial desk. Source authors and software maintainers are credited separately below; this is not a claim of hands-on testing.
Published .
RetroArch: libretro overlays — official gaming software documentation https://raw.githubusercontent.com/libretro/docs/master/docs/guides/libretro-overlays.mdRetrieved Oct 8, 2026Something doesn’t match your setup?
Suggest a correction